
BattleRobot Building Tips & Construction Photos
BattleRobot Building Tips & Construction Photos |
|
 |
|
Home
|
|

|
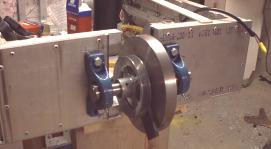 |
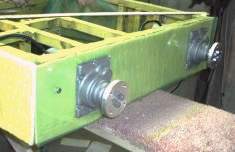
The large pillow block bearings are mounted on the front of the Battlebot and the disc weapon is put in place. | |
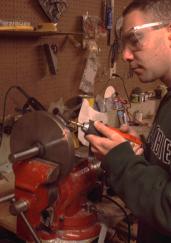 |
The chisel blades of one of the two steel discs are sharpened with a Dremel tool. This sharpened weapon will be used against Battlebots with softer armor such as aluminum and Lexan. The dull blade will be left as is for use against harder armors. | |
 |
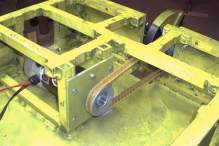
A 3 HP motor running at 36 volts will be used to power the 16 pound disc weapon. A steel reinforced v-belt will provide extra grip to avoid belt slippage. A 3:5 pulley gear reduction is used to spin the disc at nearly 4,000 rpm's. | |
 |
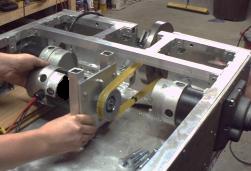
The framing for the weapons motor is temporarily riveted in place for the purpose of testing the weapon and checking the gear ratio. This framework will later be welded if the tests are successful. | |
 |
Early test results are promising. The weapon revs up to speed in under 3 seconds. It is whisper quiet and the precision-balanced disc has no noticeable vibration. We tested the destructive powers of the disc on soft materials. We'll test on harder materials once the frame is welded. At about 1/2 power, just the momentum of the disc (motor off) was enough to cut a large chunk out of 2 inch thick wood and hurl a 30 pound piece of wood 4 feet into the air. The chisels also cut through 1/4 inch Lexan without having any noticeable deceleration and even vibrated the paint off of the Lexan from the force of the impact. | |
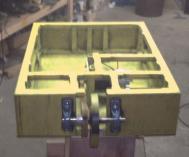 |
We got the frame back from our welder. The weapon motor mounting has been welded and a few extra support beams are added to the back end to support the spike which will soon be added. We decided to paint the frame a war yellow, however the frame will not be visible from the outside once the outer armor and decals are added. | |
 |
We painted the weapons disc with a yellow and black nuclear design. We also mounted thick foam padding behind the weapon bearings to protect our Battlebot from the tremendous forces generated upon impact. | |
 |
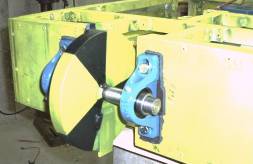
This picture shows an internal view of how the weapons motor is mounted and attached to the disc via the pulley system. A spring loaded tightening wheel will later be added to ensure that the V-belt stays very tight. | |
 |
We covered the internal aluminum frame with shock absorbing 1/4" foam and covered the foam with 1/8" fluorescent green Lexan. LED's will be placed behind the green Lexan to give our Battlebot an ominous glow. We will soon add transparent 1/2" Lexan to the outer perimeter to finish off our tri-layered armor. | |
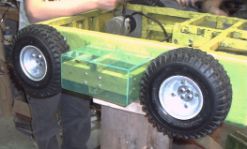 |
We mount armored side protection boxes between the tires. The 1/2" Lexan will later be attached to this box and a 1/4" Lexan skirt will be hung from the side panel at a 45 degree angle to make it very hard for our opponent to get under us. We also painted the wheel wells silver. | |
 |
We add additional framing to the back end leaving room in the middle for the rear spike to be attached. This frame will allow the rear Lexan panel to completely protect the tires. | |
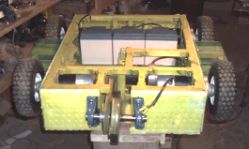 |
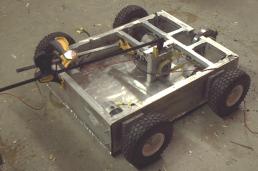
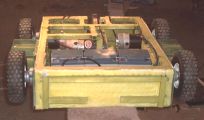
This shows the front view of our Battlebot in its current state with the weapon, motors, and batteries in place. A case will soon be built for the batteries, a larger front ramp will be added, and 1/2" Lexan will be added to form a complete perimeter of defense. | |
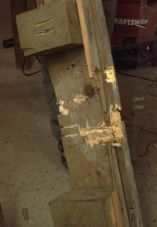
| Now that the weapon has been welded in place, we have begun testing it against various forms of armor. It has greatly exceeded our expectations. For example, we mounted 1/4" T6 grade aluminum on a 1 1/2" wood panel, staked it into the ground and added rocks to secure it in place. A single pass of one chisel from the 4,000 RPM disc slashed a thick gash in the aluminum, broke the 6 large nails holding it to the wood, flung the sheet of aluminum about 50 feet into the air, and completely destroyed the wood panel, carving a rectangle all the way through the wood. We know this was done with a single pass of a single chisel in 1/2 a rotation because only one slash mark was made on the aluminum and the two chisels are mounted on opposite sides of the disc, one inch apart. Our future tests will have to utilize a better means of securing the test armor. Once we complete these better tests we will update the pictures. We should also mention that there was no noticeable deceleration of the disc during this process. |
|
|
Home
|
|
| |
| Copyright Loganbot.com 2001-2018 |